When it comes to mocking APIs, Postman has been a long-standing favorite among developers. However, Apidog offers a smarter, faster, and more streamlined approach to API mocking, especially for front-end developers who want to focus on building instead of worrying about data setup. This blog delves into the process of creating mock servers using Postman and Apidog, providing a detailed comparison to help you make an informed decision.
What is a Mock Server and Why Use It?
A mock server is a virtual server that simulates the behavior of a real API by returning mock responses. It's typically used when:
The backend is still under development, and you need to work on the front-end.
The API is not yet available or is restricted due to privacy or security concerns.
You want to test the behavior of your application with simulated data before the actual API is ready.
Mocking can drastically improve development speed by allowing teams to progress without waiting for back-end systems to be fully implemented.
Mocking with Postman: A Step-by-Step Guide
Postman allows you to create mock servers, providing you with a simulation of your API responses for testing purposes. Here’s how you can create a mock server in Postman:
Step 1: Create a new mock server
Open Postman and go to "Mock servers”. Click on “Create mock server” to create a new mock server.

Step 2: Select an existing collection or create a new one
If you have an existing collection, select it to associate with your mock server.
To create a new collection, click on Create a New Collection, add one or more requests, and then select Next.

Step 3: Configure your mock server details
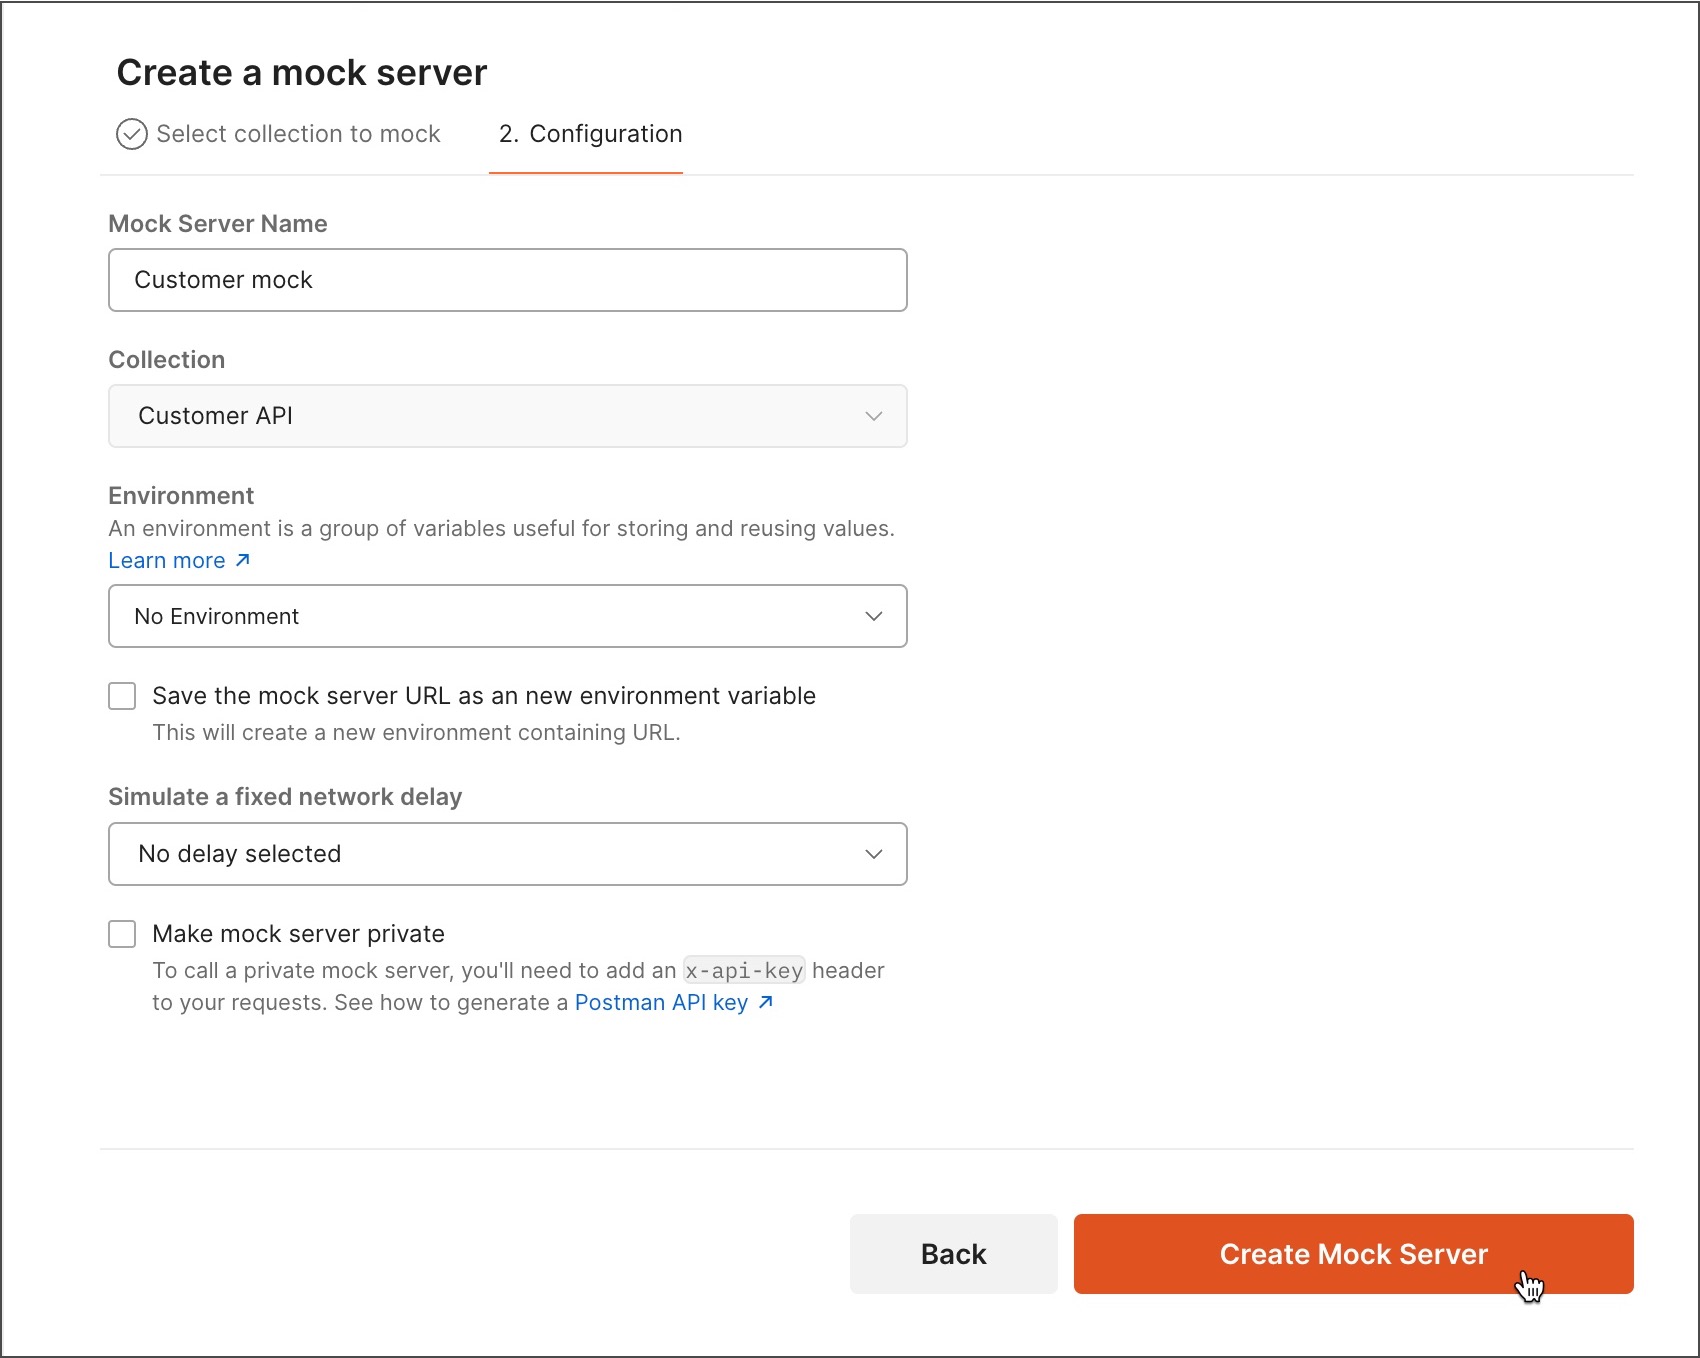
After selecting or creating your collection, it's time to configure your mock server. Below are the essential fields you will need to specify:
Mock Server Name: Choose a name for your mock server. This helps you identify it easily.
Collection: Select the collection you'd like to use for the mock server. If you want to switch collections, click Back and choose another collection.
Environment: (Optional) Select an environment if you'd like to use environment variables in your mock server.
Save Mock Server URL as a New Environment Variable:
This option saves the mock server URL as a variable in a new environment. You can then reference this variable in your requests for easy access.Simulate a Fixed Network Delay:
If you'd like to simulate a delay in the mock server's response, specify a response delay or enter a custom delay time.Make Mock Server Private:
If you need your mock server to be private (for security or other reasons), select this option. You will be required to add an API key in the request header when making requests to this private mock server.Select Create Mock Server
Once you have filled in the necessary details, enter a “Mock Server name” and click "Create Mock Server".

Step 4: Matching request body and headers
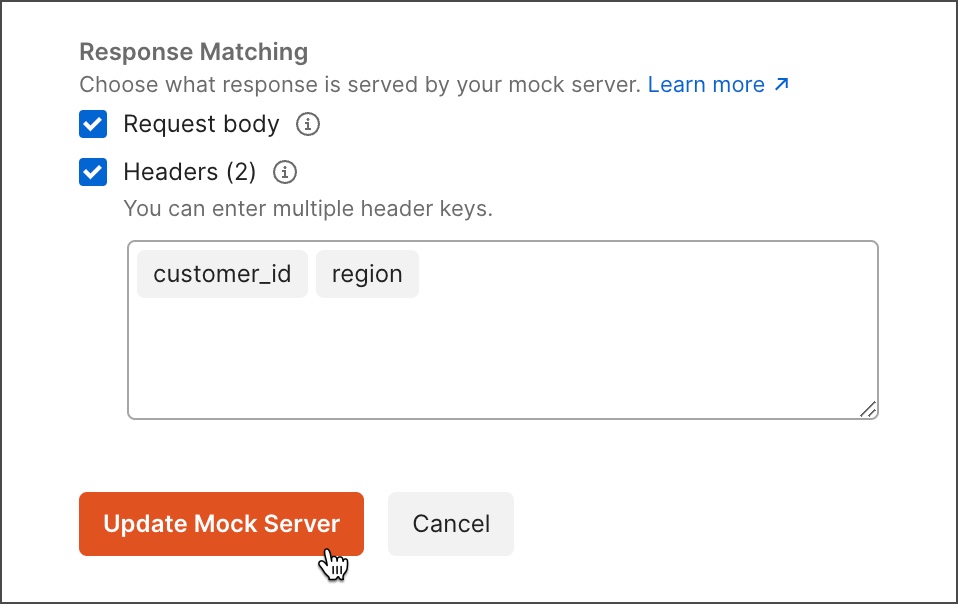
By default, Postman uses a matching algorithm to select the best example to return as a response. You can refine the matching by using body and header matching.
Enable Request Body and Header Matching
Navigate to your mock server's configuration settings.
Under Response Matching, enable the matching options you want:
Request Body: The mock server will match the request’s body to the body of the saved examples.
Headers: The mock server will match the request’s headers to the headers of the saved examples.
Specify Header Keys
Add the header keys you want the mock server to match, separating them with commas. Note that header matching is not case-sensitive.Update Mock Server
After configuring body and header matching, click Update Mock Server to apply these changes.

Step 5: Copy and Use Your Mock Server URL
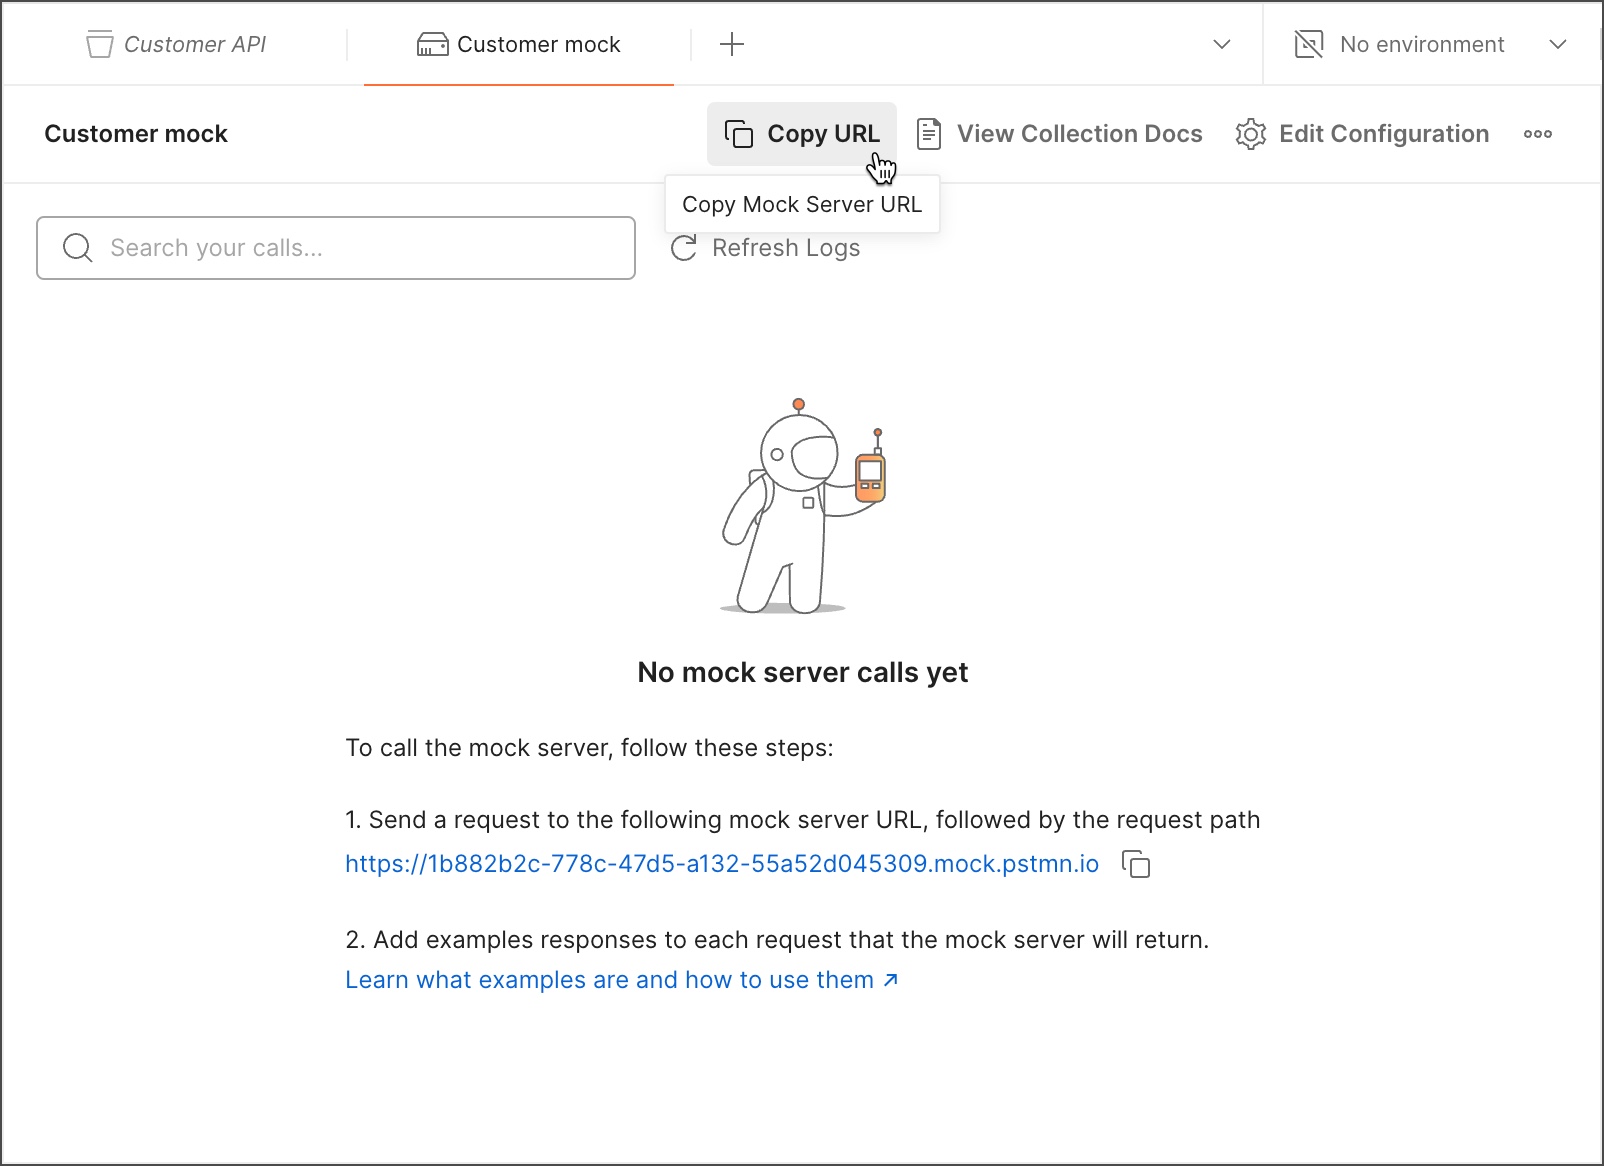
After creating the mock server, Postman will display the details for your mock server, including the Mock Server URL.
Copy the Mock Server URL:
Click the “Copy URL” to copy the URL to your clipboard. You’ll use this URL to make requests to the mock server.Use the URL in Your Requests:
Open a new request in Postman, paste the copied URL, and append the path you want to mock (e.g.,/get). Send the request, and Postman will simulate the appropriate response.

Step 6: Making Calls to Your Mock Server
Now that your mock server is set up, you can make API calls to it.
Copy the Mock Server URL: In the Mock Servers section, select your mock server and click the “Copy URL”.
Make a Request: Open a new request (or modify an existing one) in Postman and paste the mock server URL. Append the appropriate path (e.g.,
/user/home).Send the Request: Click Send, and Postman will return a response based on the saved example that best matches the request.
Postman’s approach is solid, but it requires manual input and customization for each field. While you can save responses as examples, Postman’s mock server still requires substantial configuration to generate realistic data for every request.
Mocking with Apidog: The Smart Approach
Apidog revolutionizes the mock server experience. Here’s how easy it is to mock an API in Apidog:
Step 1: Import your API definitions
Whether it's an OpenAPI (Swagger) file or another compatible format. Apidog supports more than 10 types of API documentation.

Step 2: Making Calls to Mock Server
Apidog automatically generates a mock API URL. You can directly use this URL to get a fully functioning mock response without any manual input.

The beauty of Apidog’s approach lies in its automatic generation of mock data based on built-in rules. Once you’ve imported your API definitions and specifications, Apidog handles the rest, creating realistic, dynamic mock responses for you to use in your application.
How Apidog’s Smart Mock Works:
Built-in Mocking Rules: If field names in your response match predefined templates (e.g., "id" = integer, "name" = string), Apidog automatically generates realistic data for you.

No Code Required: Apidog eliminates the need for developers to write mocking code. The platform generates mock responses automatically.
Local Mock Server: Apidog starts a mock server on your local machine, saving time by removing the need for external server configurations.
With Apidog, what would take several minutes in Postman can be achieved in under a minute, without writing any code or manually setting up each response field.
Postman Mock Server VS Apidog Smart Mock
| Feature | Postman | Apidog |
| Ease of Setup | Requires manual configuration for each field. | Automatic data generation with built-in rules. |
| Time to Mock an API | Several minutes of manual work. | In under 1 minute, no coding is required. |
| Mock Server Hosting | Requires Postman cloud or local setup. | The local server automatically started. |
| Customization | Customizable via Faker.js and examples. | Customizable mock values with Faker.js support. |
| Integration with API Docs | Needs to upload API definitions and configure mocks manually. | Seamless API doc import and instant mock URL generation. |
| Response Format | Supports text and JSON responses. | JSON responses are automatically generated. |
Why Choose Apidog Over Postman for API Mocking?
Speed and Simplicity: Apidog’s Smart Mock allows you to mock APIs in under a minute without writing any code, while Postman requires several steps and manual configuration.
All-in-One Platform: Apidog isn’t just about mocking APIs. It’s an all-in-one API development tool that integrates API design, documentation, testing, and mocking, making it easier to manage your entire API lifecycle in one place.
Automated Data Generation: Apidog uses intelligent algorithms to generate mock data dynamically, reducing the need for developers to craft mock responses manually.
Customizable Mocking: While Postman offers customization through examples and code, Apidog provides a more efficient way to adjust mock data using Faker.js syntax, offering developers full control over generated values.
Use Cases: When Should You Use Apidog’s Smart Mock?
Front-End Development: If your backend team hasn’t implemented the API yet, you can continue your work by using Apidog’s mock APIs.
Prototyping: Quickly create mock responses to demonstrate the functionality of an API without needing the actual server.
Testing APIs in Isolation: Test the front end of your application with mock responses before integrating with the backend.
Conclusion: Apidog—The Future of API Mocking
While Postman is a well-known tool in the API space, Apidog’s Smart Mock feature offers an easier, faster, and more intuitive alternative. With its ability to mock APIs in under a minute and without writing code, Apidog accelerates your development process, especially for front-end teams who rely on mock data for early-stage application development.
Choose Apidog to simplify your API workflow. Its all-in-one capabilities—ranging from API design to documentation and testing—make it the ideal solution for any development team looking to streamline their API development.
